Auto DevOps
DANGER: Auto DevOps is currently in Beta and not recommended for production use.
Introduced in GitLab 10.0.
Auto DevOps automatically detects, builds, tests, deploys, and monitors your applications.
Overview
With Auto DevOps, the software development process becomes easier to set up as every project can have a complete workflow from build to deploy and monitoring, with minimal to zero configuration.
Comprised of a set of stages, Auto DevOps brings these best practices to your project in an easy and automatic way:
As Auto DevOps relies on many different components, it's good to have a basic knowledge of the following:
Auto DevOps provides great defaults for all the stages; you can, however, customize almost everything to your needs.
Prerequisites
TIP: Tip: For self-hosted installations, the easiest way to make use of Auto DevOps is to install GitLab inside a Kubernetes cluster using the GitLab Omnibus Helm Chart which automatically installs and configures everything you need!
To make full use of Auto DevOps, you will need:
- GitLab Runner (needed for all stages) - Your Runner needs to be configured to be able to run Docker. Generally this means using the Docker or Kubernetes executor, with privileged mode enabled. The Runners do not need to be installed in the Kubernetes cluster, but the Kubernetes executor is easy to use and is automatically autoscaling. Docker-based Runners can be configured to autoscale as well, using Docker Machine. Runners should be registered as shared Runners for the entire GitLab instance, or specific Runners that are assigned to specific projects.
- Base domain (needed for Auto Review Apps and Auto Deploy) - You will need a domain configured with wildcard DNS which is gonna be used by all of your Auto DevOps applications. Read the specifics.
-
Kubernetes (needed for Auto Review Apps, Auto Deploy, and Auto Monitoring) -
To enable deployments, you will need Kubernetes 1.5+. The Kubernetes service
integration will need to be enabled for the project, or enabled as a
default service template
for the entire GitLab installation.
-
A load balancer - You can use NGINX ingress by deploying it to your
Kubernetes cluster using the
nginx-ingressHelm chart. -
Wildcard TLS termination - You can deploy the
kube-legoHelm chart to your Kubernetes cluster to automatically issue certificates for your domains using Let's Encrypt.
-
A load balancer - You can use NGINX ingress by deploying it to your
Kubernetes cluster using the
- Prometheus (needed for Auto Monitoring) - To enable Auto Monitoring, you will need Prometheus installed somewhere (inside or outside your cluster) and configured to scrape your Kubernetes cluster. To get response metrics (in addition to system metrics), you need to configure Prometheus to monitor NGINX. The Prometheus service integration needs to be enabled for the project, or enabled as a default service template for the entire GitLab installation.
NOTE: Note: If you do not have Kubernetes or Prometheus installed, then Auto Review Apps, Auto Deploy, and Auto Monitoring will be silently skipped.
Auto DevOps base domain
The Auto DevOps base domain is required if you want to make use of Auto
Review Apps and Auto Deploy. It is defined
under the project's CI/CD settings while enabling Auto DevOps.
It can also be set at the project or group level as a variable, AUTO_DEVOPS_DOMAIN.
A wildcard DNS A record matching the base domain is required, for example,
given a base domain of example.com, you'd need a DNS entry like:
*.example.com 3600 A 1.2.3.4where example.com is the domain name under which the deployed apps will be served,
and 1.2.3.4 is the IP address of your load balancer; generally NGINX
(see prerequisites). How to set up the DNS record is beyond
the scope of this document; you should check with your DNS provider.
Once set up, all requests will hit the load balancer, which in turn will route them to the Kubernetes pods that run your application(s).
NOTE: Note: If GitLab is installed using the GitLab Omnibus Helm Chart, there are two options: provide a static IP, or have one assigned. For more information see the relevant docs on the network prerequisites.
Quick start
If you are using GitLab.com, see our quick start guide for using Auto DevOps with GitLab.com and an external Kubernetes cluster on Google Cloud.
Enabling Auto DevOps
NOTE: Note: If you haven't done already, read the prerequisites to make full use of Auto DevOps. If this is your fist time, we recommend you follow the quick start guide.
- Go to your project's Settings > CI/CD > General pipelines settings and find the Auto DevOps section
- Select "Enable Auto DevOps"
- Optionally, but recommended, add in the base domain that will be used by Kubernetes to deploy your application
- Hit Save changes for the changes to take effect
Now that it's enabled, there are a few more steps depending on whether your project
has a .gitlab-ci.yml or not:
-
For projects with no
.gitlab-ci.ymlpresent: A pipeline needs to be triggered either by pushing a new commit to the repository or manually visitinghttps://example.gitlab.com/<username>/<project>/pipelines/newand creating a new pipeline for your default branch, generallymaster. -
For projects with a
.gitlab-ci.ymlpresent: All you need to do is remove your existing.gitlab-ci.yml, and you can even do that in a branch to test Auto DevOps before committing tomaster.
Stages of Auto DevOps
The following sections describe the stages of Auto DevOps. Read them carefully to understand how each one works.
Auto Build
Auto Build creates a build of the application in one of two ways:
- If there is a
Dockerfile, it will usedocker buildto create a Docker image. - Otherwise, it will use Herokuish and Heroku buildpacks to automatically detect and build the application into a Docker image.
Either way, the resulting Docker image is automatically pushed to the Container Registry and tagged with the commit SHA.
CAUTION: Important:
If you are also using Auto Review Apps and Auto Deploy and choose to provide
your own Dockerfile, make sure you expose your application to port
5000 as this is the port assumed by the default Helm chart.
Auto Test
Auto Test automatically runs the appropriate tests for your application using Herokuish and Heroku buildpacks by analyzing your project to detect the language and framework. Several languages and frameworks are detected automatically, but if your language is not detected, you may succeed with a custom buildpack. Check the currently supported languages.
NOTE: Note: Auto Test uses tests you already have in your application. If there are no tests, it's up to you to add them.
Auto Code Quality
Auto Code Quality uses the open source
codeclimate image to run
static analysis and other code checks on the current code. The report is
created, and is uploaded as an artifact which you can later download and check
out. In GitLab Enterprise Edition Starter, differences between the source and
target branches are
shown in the merge request widget.
Auto Review Apps
NOTE: Note: This is an optional step, since many projects do not have a Kubernetes cluster available. If the prerequisites are not met, the job will silently be skipped.
CAUTION: Caution: Your apps should not be manipulated outside of Helm (using Kubernetes directly.) This can cause confusion with Helm not detecting the change, and subsequent deploys with Auto DevOps can undo your changes. Also, if you change something and want to undo it by deploying again, Helm may not detect that anything changed in the first place, and thus not realize that it needs to re-apply the old config.
Review Apps are temporary application environments based on the branch's code so developers, designers, QA, product managers, and other reviewers can actually see and interact with code changes as part of the review process. Auto Review Apps create a Review App for each branch.
The Review App will have a unique URL based on the project name, the branch
name, and a unique number, combined with the Auto DevOps base domain. For
example, user-project-branch-1234.example.com. A link to the Review App shows
up in the merge request widget for easy discovery. When the branch is deleted,
for example after the merge request is merged, the Review App will automatically
be deleted.
Auto Deploy
NOTE: Note: This is an optional step, since many projects do not have a Kubernetes cluster available. If the prerequisites are not met, the job will silently be skipped.
CAUTION: Caution: Your apps should not be manipulated outside of Helm (using Kubernetes directly.) This can cause confusion with Helm not detecting the change, and subsequent deploys with Auto DevOps can undo your changes. Also, if you change something and want to undo it by deploying again, Helm may not detect that anything changed in the first place, and thus not realize that it needs to re-apply the old config.
After a branch or merge request is merged into the project's default branch (usually
master), Auto Deploy deploys the application to a production environment in
the Kubernetes cluster, with a namespace based on the project name and unique
project ID, for example project-4321.
Auto Deploy doesn't include deployments to staging or canary by default, but the Auto DevOps template contains job definitions for these tasks if you want to enable them.
You can make use of environment variables to automatically scale your pod replicas.
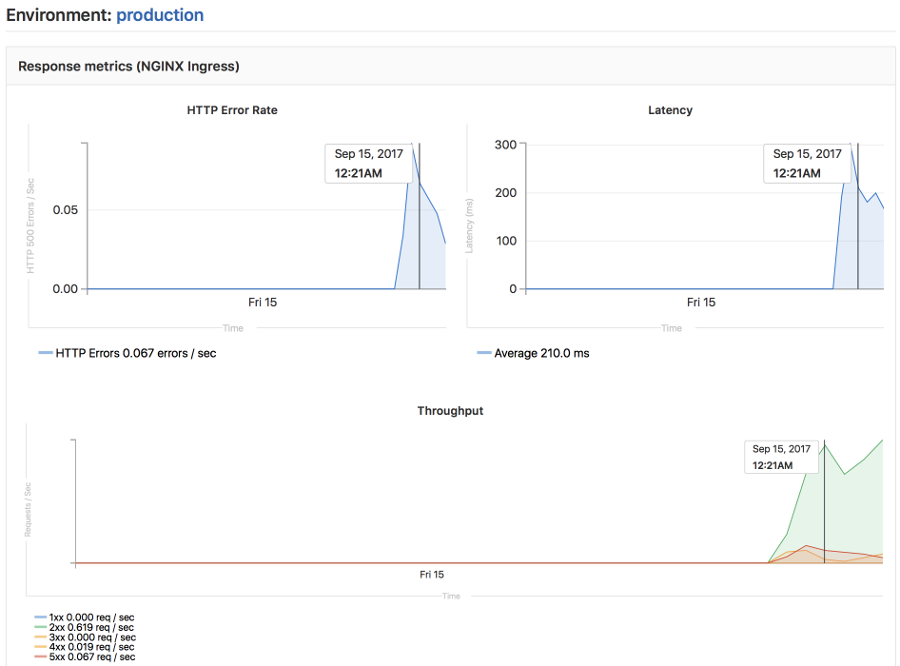
Auto Monitoring
NOTE: Note: Check the prerequisites for Auto Monitoring to make this stage work.
Once your application is deployed, Auto Monitoring makes it possible to monitor your application's server and response metrics right out of the box. Auto Monitoring uses Prometheus to get system metrics such as CPU and memory usage directly from Kubernetes, and response metrics such as HTTP error rates, latency, and throughput from the NGINX server.
The metrics include:
- Response Metrics: latency, throughput, error rate
- System Metrics: CPU utilization, memory utilization
If GitLab has been deployed using the GitLab Omnibus Helm Chart, no configuration is required.
If you have installed GitLab using a different method, you need to:
- Deploy Prometheus into your Kubernetes cluster
- If you would like response metrics, ensure you are running at least version 0.9.0 of NGINX Ingress and enable Prometheus metrics.
- Finally, annotate
the NGINX Ingress deployment to be scraped by Prometheus using
prometheus.io/scrape: "true"andprometheus.io/port: "10254".
To view the metrics, open the Monitoring dashboard for a deployed environment.
Customizing
While Auto DevOps provides great defaults to get you started, you can customize
almost everything to fit your needs; from custom buildpacks,
to Dockerfiles, Helm charts, or
even copying the complete CI/CD configuration
into your project to enable staging and canary deployments, and more.
Custom buildpacks
If the automatic buildpack detection fails for your project, or if you want to
use a custom buildpack, you can override the buildpack using a project variable
or a .buildpack file in your project:
-
Project variable - Create a project variable
BUILDPACK_URLwith the URL of the buildpack to use. -
.buildpackfile - Add a file in your project's repo called.buildpackand add the URL of the buildpack to use on a line in the file. If you want to use multiple buildpacks, you can enter them in, one on each line.
CAUTION: Caution: Using multiple buildpacks isn't yet supported by Auto DevOps.
Custom Dockerfile
If your project has a Dockerfile in the root of the project repo, Auto DevOps
will build a Docker image based on the Dockerfile rather than using buildpacks.
This can be much faster and result in smaller images, especially if your
Dockerfile is based on Alpine.
Custom Helm Chart
Auto DevOps uses Helm to deploy your application to Kubernetes. You can override the Helm chart used by bundling up a chart into your project repo or by specifying a project variable:
-
Bundled chart - If your project has a
./chartsdirectory with aChart.yamlfile in it, Auto DevOps will detect the chart and use it instead of the default one. This can be a great way to control exactly how your application is deployed. -
Project variable - Create a project variable
AUTO_DEVOPS_CHARTwith the URL of a custom chart to use.
Customizing .gitlab-ci.yml
If you want to modify the CI/CD pipeline used by Auto DevOps, you can copy the Auto DevOps template into your project's repo and edit as you see fit.
Assuming that your project is new or it doesn't have a .gitlab-ci.yml file
present:
- From your project home page, either click on the "Set up CI" button, or click
on the plus button and (
+), then "New file" - Pick
.gitlab-ci.ymlas the template type - Select "Auto-DevOps" from the template dropdown
- Edit the template or add any jobs needed
- Give an appropriate commit message and hit "Commit changes"
TIP: Tip: The Auto DevOps template includes useful comments to help you
customize it. For example, if you want deployments to go to a staging environment
instead of directly to a production one, you can enable the staging job by
renaming .staging to staging. Then make sure to uncomment the when key of
the production job to turn it into a manual action instead of deploying
automatically.
PostgreSQL database support
In order to support applications that require a database,
PostgreSQL is provisioned by default. The credentials to access
the database are preconfigured, but can be customized by setting the associated
variables. These credentials can be used for defining a
DATABASE_URL of the format:
postgres://user:password@postgres-host:postgres-port/postgres-databaseEnvironment variables
The following variables can be used for setting up the Auto DevOps domain, providing a custom Helm chart, or scaling your application. PostgreSQL can be also be customized, and you can easily use a custom buildpack.
| Variable | Description |
|---|---|
AUTO_DEVOPS_DOMAIN |
The Auto DevOps domain; by default set automatically by the Auto DevOps setting. |
AUTO_DEVOPS_CHART |
The Helm Chart used to deploy your apps; defaults to the one provided by GitLab. |
PRODUCTION_REPLICAS |
The number of replicas to deploy in the production environment; defaults to 1. |
CANARY_PRODUCTION_REPLICAS |
The number of canary replicas to deploy for Canary Deployments in the production environment. |
POSTGRES_ENABLED |
Whether PostgreSQL is enabled; defaults to "true". Set to false to disable the automatic deployment of PostgreSQL. |
POSTGRES_USER |
The PostgreSQL user; defaults to user. Set it to use a custom username. |
POSTGRES_PASSWORD |
The PostgreSQL password; defaults to testing-password. Set it to use a custom password. |
POSTGRES_DB |
The PostgreSQL database name; defaults to the value of $CI_ENVIRONMENT_SLUG. Set it to use a custom database name. |
BUILDPACK_URL |
The buildpack's full URL. It can point to either Git repositories or a tarball URL. For Git repositories, it is possible to point to a specific ref, for example https://github.com/heroku/heroku-buildpack-ruby.git#v142
|
TIP: Tip: Set up the replica variables using a project variable and scale your application by just redeploying it!
CAUTION: Caution: You should not scale your application using Kubernetes directly. This can cause confusion with Helm not detecting the change, and subsequent deploys with Auto DevOps can undo your changes.
Advanced replica variables setup
Apart from the two replica-related variables for production mentioned above, you can also use others for different environments.
There's a very specific mapping between Kubernetes' label named track,
GitLab CI/CD environment names, and the replicas environment variable.
The general rule is: TRACK_ENV_REPLICAS. Where:
-
TRACK: The capitalized value of thetrackKubernetes label in the Helm Chart app definition. If not set, it will not be taken into account to the variable name. -
ENV: The capitalized environment name of the deploy job that is set in.gitlab-ci.yml.
That way, you can define your own TRACK_ENV_REPLICAS variables with which
you will be able to scale the pod's replicas easily.
In the example below, the environment's name is qa which would result in
looking for the QA_REPLICAS environment variable:
QA testing:
  stage: deploy
  environment:
    name: qa
  script:
  - deploy qa
If, in addition, there was also a track: foo defined in the application's Helm
chart, like:
replicaCount: 1
image:
  repository: gitlab.example.com/group/project
  tag: stable
  pullPolicy: Always
  secrets:
    - name: gitlab-registry
application:
  track: foo
  tier: web
service:
  enabled: true
  name: web
  type: ClusterIP
  url: http://my.host.com/
  externalPort: 5000
  internalPort: 5000
then the environment variable would be FOO_QA_REPLICAS.
Currently supported languages
NOTE: Note: Not all buildpacks support Auto Test yet, as it's a relatively new enhancement. All of Heroku's officially supported languages support it, and some third-party buildpacks as well e.g., Go, Node, Java, PHP, Python, Ruby, Gradle, Scala, and Elixir all support Auto Test, but notably the multi-buildpack does not.
As of GitLab 10.0, the supported buildpacks are:
- heroku-buildpack-multi     v1.0.0
- heroku-buildpack-ruby      v168
- heroku-buildpack-nodejs    v99
- heroku-buildpack-clojure   v77
- heroku-buildpack-python    v99
- heroku-buildpack-java      v53
- heroku-buildpack-gradle    v23
- heroku-buildpack-scala     v78
- heroku-buildpack-play      v26
- heroku-buildpack-php       v122
- heroku-buildpack-go        v72
- heroku-buildpack-erlang    fa17af9
- buildpack-nginx            v8
Limitations
The following restrictions apply.
Private project support
CAUTION: Caution: Private project support in Auto DevOps is experimental.
When a project has been marked as private, GitLab's Container Registry requires authentication when downloading containers. Auto DevOps will automatically provide the required authentication information to Kubernetes, allowing temporary access to the registry. Authentication credentials will be valid while the pipeline is running, allowing for a successful initial deployment.
After the pipeline completes, Kubernetes will no longer be able to access the Container Registry. Restarting a pod, scaling a service, or other actions which require on-going access to the registry may fail. On-going secure access is planned for a subsequent release.
Troubleshooting
- Auto Build and Auto Test may fail in detecting your language/framework. There
may be no buildpack for your application, or your application may be missing the
key files the buildpack is looking for. For example, for ruby apps, you must
have a
Gemfileto be properly detected, even though it is possible to write a Ruby app without aGemfile. Try specifying a custom buildpack. - Auto Test may fail because of a mismatch between testing frameworks. In this
case, you may need to customize your
.gitlab-ci.ymlwith your test commands.
Disable the banner instance wide
If an administrator would like to disable the banners on an instance level, this feature can be disabled either through the console:
sudo gitlab-rails consoleThen run:
Feature.get(:auto_devops_banner_disabled).enableOr through the HTTP API with an admin access token:
curl --data "value=true" --header "PRIVATE-TOKEN: private_token" https://gitlab.example.com/api/v4/features/auto_devops_banner_disabled